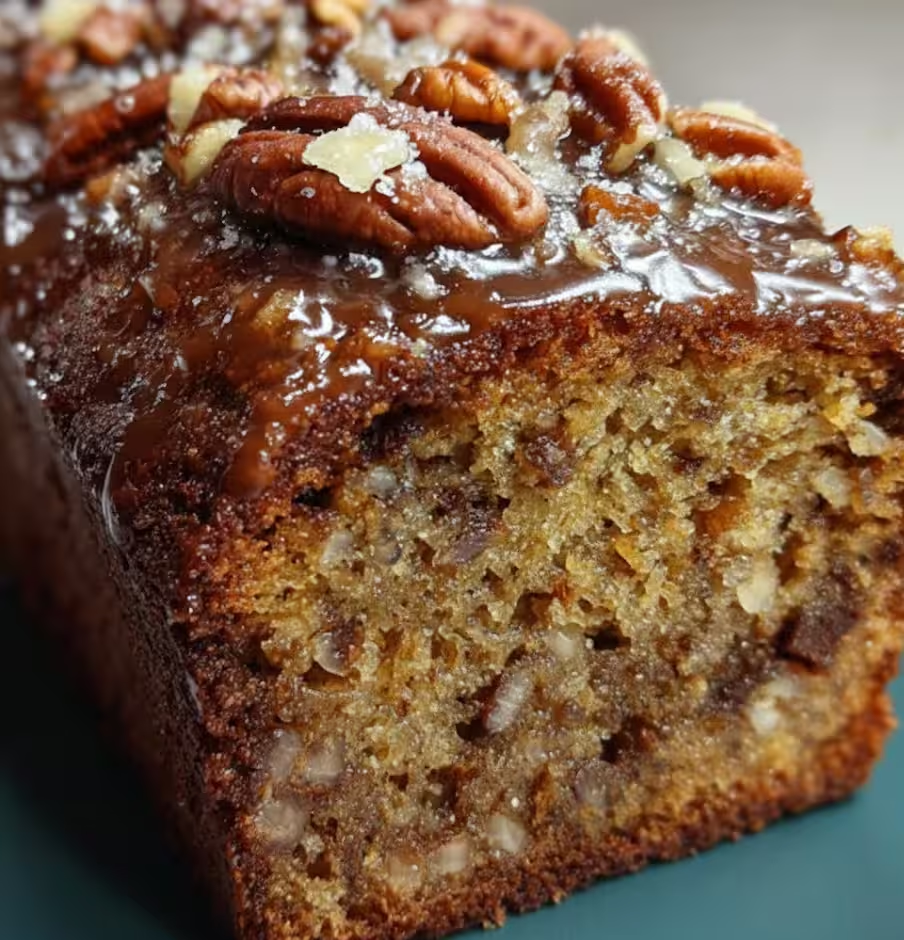
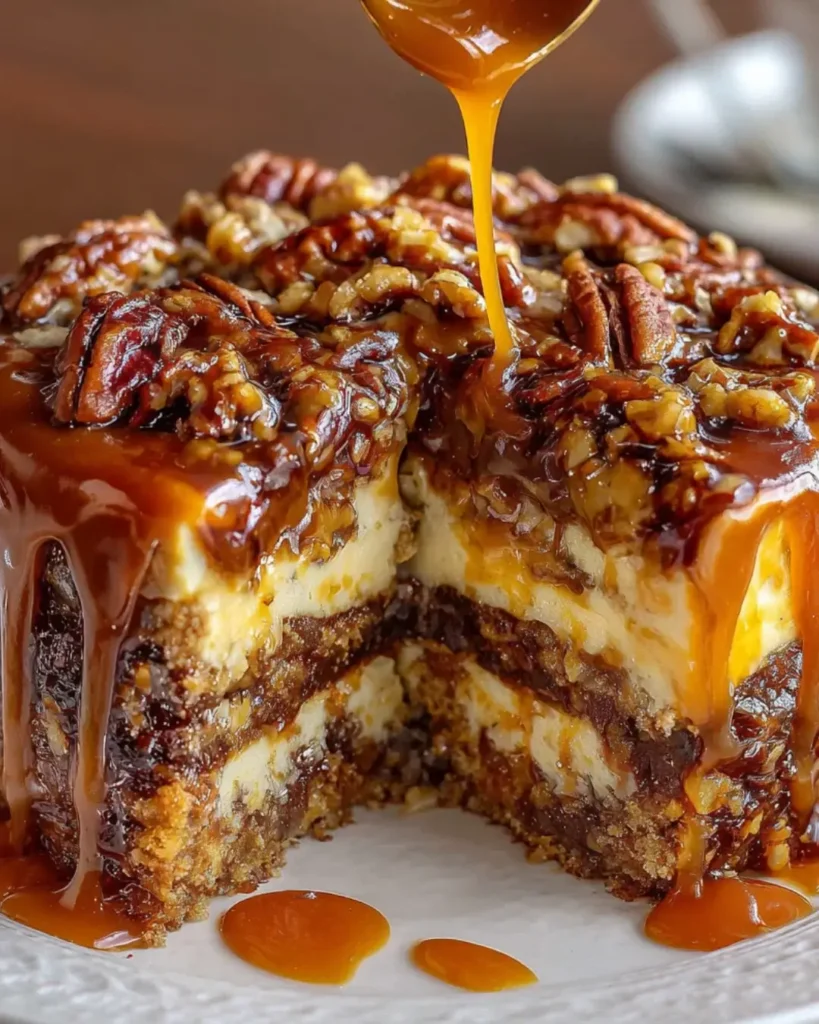
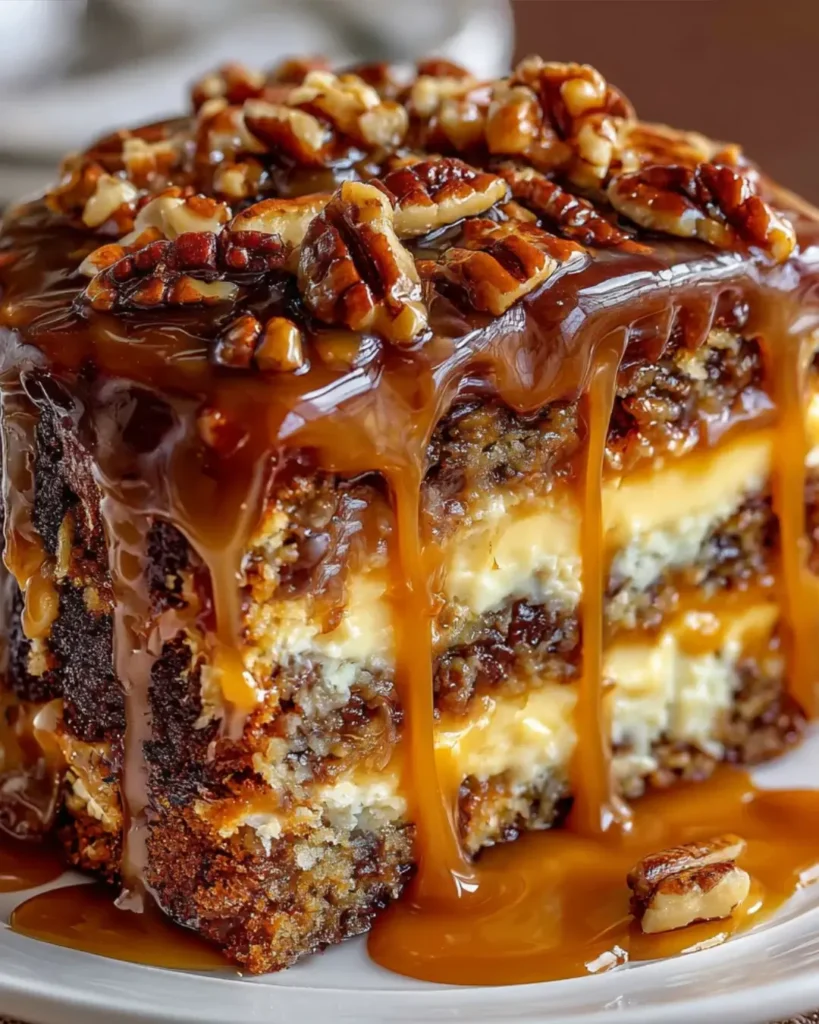
This decadent dessert captures the essence of the beloved Turtle candy in cake form, featuring moist, dark chocolate layers generously topped with gooey caramel, crunchy pecans, and semi-sweet chocolate chips. It is an “unfrosted” naked cake that relies on the richness of the toppings and the depth of the cocoa sponge to deliver a luxurious, sticky-sweet experience.
Why You’ll Love This Recipe
- Texture Heaven – The combination of soft, fluffy sponge cake with the snap of chocolate chips and the crunch of toasted pecans creates a satisfying mouthfeel.
- No Frosting Skills Needed – This recipe skips the stress of smoothing buttercream; the “drizzle and dump” decoration method looks rustic and appetizing without effort.
- Rich Chocolate Flavor – The boiling water method blooms the cocoa powder, ensuring the cake itself is deeply chocolatey and not just a vehicle for sugar.
- Customizable Sweetness – Because you control the caramel drizzle, you can adjust the sweetness level to your preference compared to a fully frosted cake.
- Visual Appeal – The cascading caramel and abundant toppings make for a stunning presentation that looks like it came from a specialty bakery.
- Pantry Staples – Despite its fancy appearance, the base cake uses standard ingredients found in most kitchens, making it accessible for spur-of-the-moment baking.
Ingredients You’ll Need
The Chocolate Cake Layers
- All-Purpose Flour (2 cups) – The structural base; measure correctly to avoid a dense crumb.
- Granulated Sugar (1½ cups) – Sweetens the cake and aids in tenderness.
- Unsweetened Cocoa Powder (½ cup) – Natural or Dutch-process works; gives the cake its chocolate identity.
- Leavening (1½ tsp Baking Powder & 1 tsp Baking Soda) – A double-lift combination to ensure the heavy batter rises properly.
- Whole Milk (1 cup) – Adds moisture and richness to the crumb.
- Vegetable Oil (½ cup) – Keeps the cake moist for days; butter can dry out in chocolate cakes, so oil is preferred here.
- Eggs (2 large) – Binds the batter and adds structure.
- Boiling Water (1 cup) – Essential for blooming the cocoa and creating a velvety batter consistency.
- Vanilla Extract (2 tsp) – Rounds out the flavors.
The “Turtle” Toppings
- Caramel Sauce (1 cup) – Use a thick, high-quality jarred sauce or homemade salted caramel; thin sauces will soak in too much and disappear.
- Chopped Pecans (1 cup) – The signature nut for “Turtle” desserts; toast them lightly for better flavor.
- Chocolate Chips (1 cup) – Semi-sweet chips work best to balance the sweet caramel; mini chips or chunks are also good options.
Step-by-Step Instructions
Step 1: Prep the Oven and Pans Preheat your oven to 350°F (175°C). Grease two 9-inch round cake pans generously with butter or cooking spray, and dust with flour (or cocoa powder) to prevent sticking.
Step 2: Whisk Dry Ingredients In a large mixing bowl, combine the flour, sugar, cocoa powder, baking powder, baking soda, and salt. Whisk thoroughly to break up any cocoa lumps and aerate the mixture.
Step 3: Add Wet Ingredients Add the milk, vegetable oil, eggs, and vanilla extract to the dry mix. Beat with an electric mixer on medium speed for about 2 minutes. This develops a little gluten structure to hold the cake together.
Step 4: The Boiling Water Method Pour the boiling water into the batter while stirring by hand or on the lowest mixer speed. The batter will become very thin and liquid—do not panic, this is exactly how it should look.
Step 5: Bake Pour the batter evenly between the two prepared pans. Bake for 30–35 minutes. Test for doneness by inserting a toothpick into the center; it should come out clean or with a few moist crumbs.
Step 6: Cool Down Let the cakes cool in the pans for 10 minutes to set. Run a knife around the edges, then carefully invert them onto a wire rack to cool completely. Do not assemble while warm, or the toppings will slide off.
Step 7: Assemble and Decorate Place the first cake layer on your serving plate. Drizzle it with half of the caramel sauce, spreading slightly but letting it pool. Sprinkle with half the pecans and chocolate chips. Place the second cake layer on top and repeat with the remaining caramel, nuts, and chips.
Recipe Notes & Tips
- Toast the Pecans – Raw pecans can be waxy. Toast them in a dry skillet for 3–5 minutes before chopping to release their natural oils and crunch.
- Caramel Consistency – If your caramel is too stiff, warm it slightly (10 seconds in the microwave) so it pours easily. If it’s too thin, simmer it on the stove to reduce, or the cake will absorb it all and become soggy.
- Stabilize the Layers – If the caramel makes the layers slippery, you can insert a bamboo skewer or straw down the center to hold the top layer in place while moving the cake.
- Lining Pans – For guaranteed release, cut circles of parchment paper to line the bottoms of your cake pans.
- Serving Temperature – This cake is delicious at room temperature, but a quick 10-second zap in the microwave before eating melts the chocolate chips slightly for a gooey experience.
Nutritional Information
- Prep Time: 20 minutes
- Cooking Time: 35 minutes
- Total Time: 55 minutes (+ cooling)
- Servings: 10–12 Slices
- Calories: Approximately 450–500 kcal per slice (dependent on caramel amount)
Perfect Pairings
- Unsweetened Whipped Cream – A dollop of plain cream cuts the intense sugar of the caramel.
- Dark Roast Coffee – The bitterness of the coffee balances the sweetness of the caramel and chocolate.
- Bourbon – A glass of bourbon or whiskey complements the toasted pecans and caramel notes.
- Vanilla Bean Ice Cream – Serve slightly warm with ice cream for a “hot fudge sundae” style dessert.
Ideal Occasions
- Thanksgiving Dessert – The pecans and caramel fit perfectly with autumn flavor profiles.
- Birthdays – An impressive-looking cake that is easier to make than a layered fondant cake.
- Dinner Parties – It looks rustic yet elegant when served on a nice platter.
- Chocolate Cravings – When you need a serious chocolate fix without the hassle of making frosting.
Storage & Serving Tips
- Room Temperature – Can be stored in an airtight container at room temperature for up to 2 days.
- Refrigeration – For longer storage (up to 5 days), keep it in the fridge. Bring to room temperature before serving to soften the caramel.
- Freezing – Freeze the cake layers unadorned for up to 2 months. Thaw and add the toppings fresh before serving.
- Slicing – Use a sharp, hot knife to cut through the sticky caramel and nuts cleanly.
Creative Variations to Try
- Salted Caramel – Sprinkle flaky sea salt (like Maldon) over the caramel layers to create a sweet-salty contrast.
- Mocha Twist – Add 1 teaspoon of espresso powder to the boiling water in the cake batter to intensify the chocolate flavor.
- Cream Layer – Spread a layer of stabilized whipped cream or cream cheese frosting between the layers along with the caramel for added height and creaminess.
- Toffee Crunch – Add Heath or Skor toffee bits to the topping mixture for an extra crunchy texture.
Troubleshooting Common Issues
- Cake Sunk in Middle – This usually means the oven door was opened too early or the leavening agents were expired. Trust the timer and don’t peek until the end.
- Toppings Sliding Off – If the caramel is too hot or the cake is too warm, the sauce acts like a lubricant. Ensure everything is cool before assembly.
- Dry Cake – This comes from overbaking or measuring flour by dipping the cup into the bag (packing it down). Spoon and level your flour.
- Caramel Absorbed – If the caramel vanishes into the cake, your sauce was too thin. Use a thick dessert sauce or dulce de leche for better staying power.
Why This Recipe Works
This recipe uses a high-ratio liquid batter. The large amount of liquid (milk plus boiling water) ensures the cocoa powder is fully hydrated, preventing the drying effect cocoa can sometimes have on baked goods. The boiling water specifically helps bloom the cocoa, releasing flavor compounds that are trapped in the cocoa butter.
Structurally, using oil instead of butter coats the flour proteins more effectively, inhibiting gluten formation. This results in a tender, moist crumb that stays soft even when cool. The “naked” assembly style eliminates the need for frosting skills while ensuring every bite has the perfect ratio of soft cake to sticky, crunchy toppings.
Final Thoughts
The Turtle Caramel Cake is a masterclass in rustic elegance. It proves that you don’t need piping bags or fondant to create a show-stopping dessert. With its deep chocolate base and the classic, irresistible trio of caramel, pecans, and chocolate chips, it is a crowd-pleaser that delivers comfort and luxury in equal measure. Whether for a holiday table or a Tuesday treat, this cake is pure indulgence.